Quick Setup
Plug in the Bus Pirate
Connect the Bus Pirate to your computer with a USB C cable.
The Bus Pirate currently appears as three USB devices:
- USB CDC class device 0: an emulated serial port for accessing the user terminal
- USB CDC class device 1: an emulated serial port for accessing the binary scripting interface
- USB Mass Storage Device: a disk drive interface for accessing onboard storage
These are common device classes and recent operating systems will not request or require a driver. We’re living in the future, woohoo!
Connect with a terminal emulator
A terminal emulator is software that connects to the Bus Pirate serial interface and displays the command line. The Bus Pirate supports VT100 for a colorful interface with a live view statusbar. A fallback monochrome ASCII mode is also available. Most terminal emulators support VT100, it’s been around since the 1970s.
Find the serial port
Your terminal emulation software will probably detect and list all the available serial ports connected to your computer. If there’s more than one serial port, you can connect to each and press enter until you find the Bus Pirate terminal. You can probably skip this step, but if you need to find the port manually follow the instructions below.
- Press the Windows key or open the start menu
- Type
Device Manager - Click on the Device Manager to open it
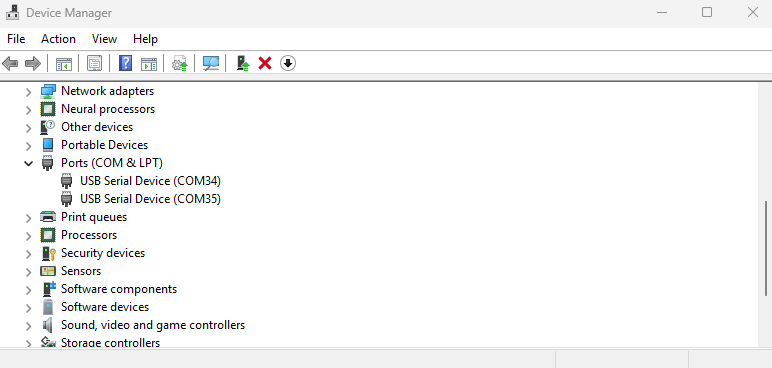
- In the Device Manager look for
Ports (COM & LPT), expand it - In the example the Bus Pirate is connected as COM34 and COM35
One COM port will be the terminal, the other will be the binary access mode for logic analyzers and other software. The lower number is usually the terminal, but Windows is not always consistent. You may need to try both ports.
Fire up a terminal emulator
- We’re huge fans of Tera Term on Windows. Download and install the latest version.
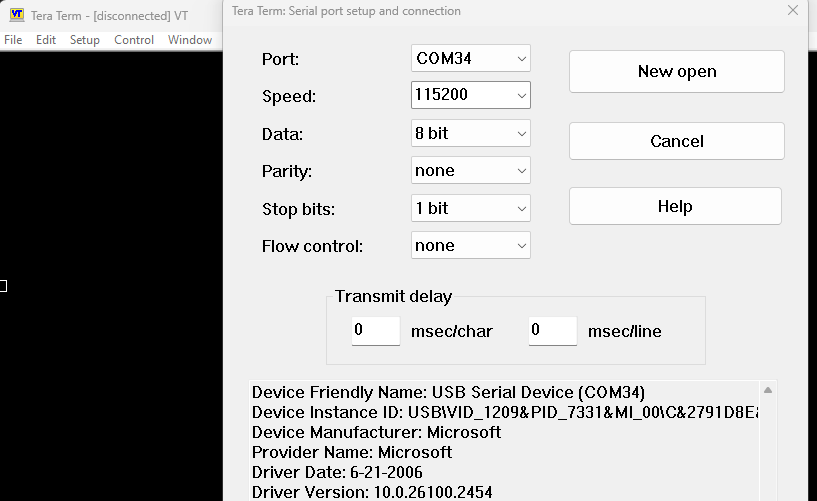
- Open Tera Term and select
SetupthenSerial port. - Choose the Bus Pirate port, and configure it for 115200 (speed), 8 bit (data), None (parity), and 1 bit (stop bits).
- Click
New Opento open the port.
Configure the terminal
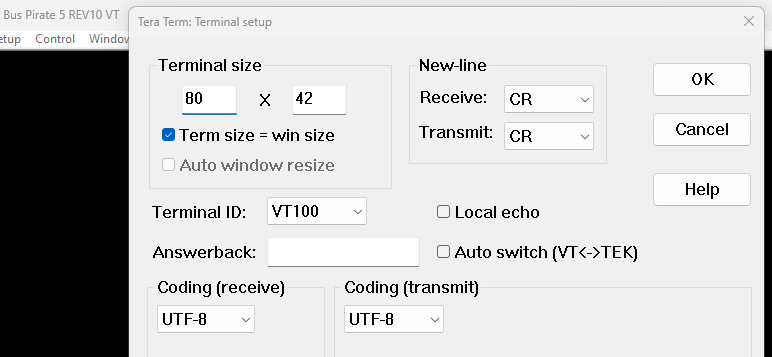
- Now select
SetupthenTerminal. - Configure as shown above. Terminal size 80x24, New-line both set to CR, Terminal ID set to VT100. Click
OK. - To save the settings for next time, choose
SetupthenSave Settings.
Seeing duplicate characters when you type? Check that local echo is unchecked in this menu.
Start the Bus Pirate

- Press
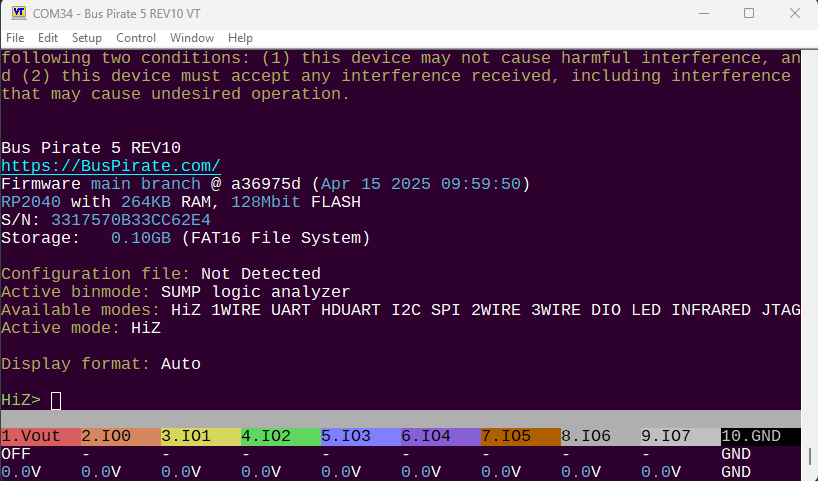
Enterin the terminal. - The Bus Pirate will prompt you to choose VT100 color mode or the fallback ASCII monochrome mode.
- We recommend you type
yfollowed by theenterkey.
You should see something like this. Congratulations, you’re talking to the Bus Pirate!
Your terminal emulation software will probably detect and list all the available serial ports connected to your computer. If there’s more than one serial port, you can connect to each and press enter until you find the Bus Pirate terminal.
Bus Pirate shell scripts
Two helper scripts can help setup a terminal program and automate common tasks.
BusPirateSetup.sh
# BusPirateSetup
# This script generates the file $HOME/.config/buspirate
# It lets you configure
#	1) If you have a BusPirate 5XL instead of a BusPirate 6
#	2) If you have a BusPirate 5 Rev 8 instead of the released BusPirate 5
#	3) The directory where new versions of the firmware are located
# 4) Which terminal emulation program you use
# You can re-run this program at any time to modify these values
# Optionally, you can edit ~/.config/buspirate/$CONFIG
A script to setup the Bus Pirate on Linux offers the choice of 3 terminal emulators:
- tio
- minicom
- screen
BusPirate.sh
# Launch BusPirate using your choice of terminal emulators
# It checks for mounted file systems and warns you if they are missing
# If the BusPirate is in boot mode, it helps install new firmware,
# and prevents some errors like installing incompatible firmware
# There is a companion program - BusPirateSetup - that helps set things up.
# Run that program first

# Usage: BusPirate [-n] [-v] [terminal] [baud]
#       BusPirate -n       -- ignores the checks for mounted file system
#       BusPirate -v       -- echos the command, port, and baud rate
# Examples
#       BusPirate                             - uses the defaults
# 		BusPirate /dev/ttyACM2                - if it's on a different port
# 		BusPirate -n /dev/ttyACM0 11920       - Ignore mounted file system, specify al params
# To Install:
#    install BusPirateSetup.sh ~/bin/BusPirate
A second script launches the terminal emulator of your choice, uploads firmware or reminds you to plug in the Bus Pirate.
tio
tio is a serial terminal emulator specifically designed for hardware development. It has a lot of nice features:
- Defaults to 115200 8n1
- Gracefully reconnects when a serial device goes down and comes back up
- Key remapping so you have your choice of backspace behavior
# Config file for tio serial terminal emulator

[bp5]
device = /dev/ttyACM0
map = INLCRNL,ODELBS

[bp3]
device = /dev/ttyUSB0
map = INLCRNL,ODELBS
In the config file, you can even setup profiles for different devices.
tio bp5or
tio bp3Now you can connect to either Bus Pirate 5 or Bus Pirate v3 using the short name specified in the config file.
GNU screen
GNU screen is a simple terminal emulator.
$ screen /dev/ttyACM0 115200,8n1Substitute ACM0 for the name of your serial device. Now you can enter command.
- If you don’t know the device name, check
dmesgoutput. - To exit, type
ctrl+a, shift+ktheny.
Find the serial port
Your terminal emulation software will probably detect and list all the available serial ports connected to your computer. If there’s more than one serial port, you can connect to each and press enter until you find the Bus Pirate terminal. You can probably skip this step, but if you need to find the port manually follow the instructions below.
The easiest way to find the serial ports is probably with a terminal (see the next section). From a terminal, run:
ls -lh /dev/*usb*You should see four “usbmodem” devices.
  crw-rw-rw-  1 root  wheel  0x9000007 May  9 18:59 /dev/cu.usbmodem1234567890121
  crw-rw-rw-  1 root  wheel  0x9000009 May  9 18:59 /dev/cu.usbmodem1234567890123
  crw-rw-rw-  1 root  wheel  0x9000006 May  9 18:59 /dev/tty.usbmodem1234567890121
  crw-rw-rw-  1 root  wheel  0x9000008 May  9 18:59 /dev/tty.usbmodem1234567890123
The ones that start with cu and the ones that start with tty are identical. The tty version
grants you exclusive access, while the cu ones allow multiple processes to access the serial port at once.
In this example, you want to use /dev/cu.usbmodem1234567890121. The other /dev/cu, which ends in 3, is
for the binary interface.
Another way to find information about the Bus Pirate on a Mac is:
- Click on Apple Menu->About This Mac
- Click the “More Info…” button
- Scroll Down and click “More Information”
- Click USB on the sidebar_label
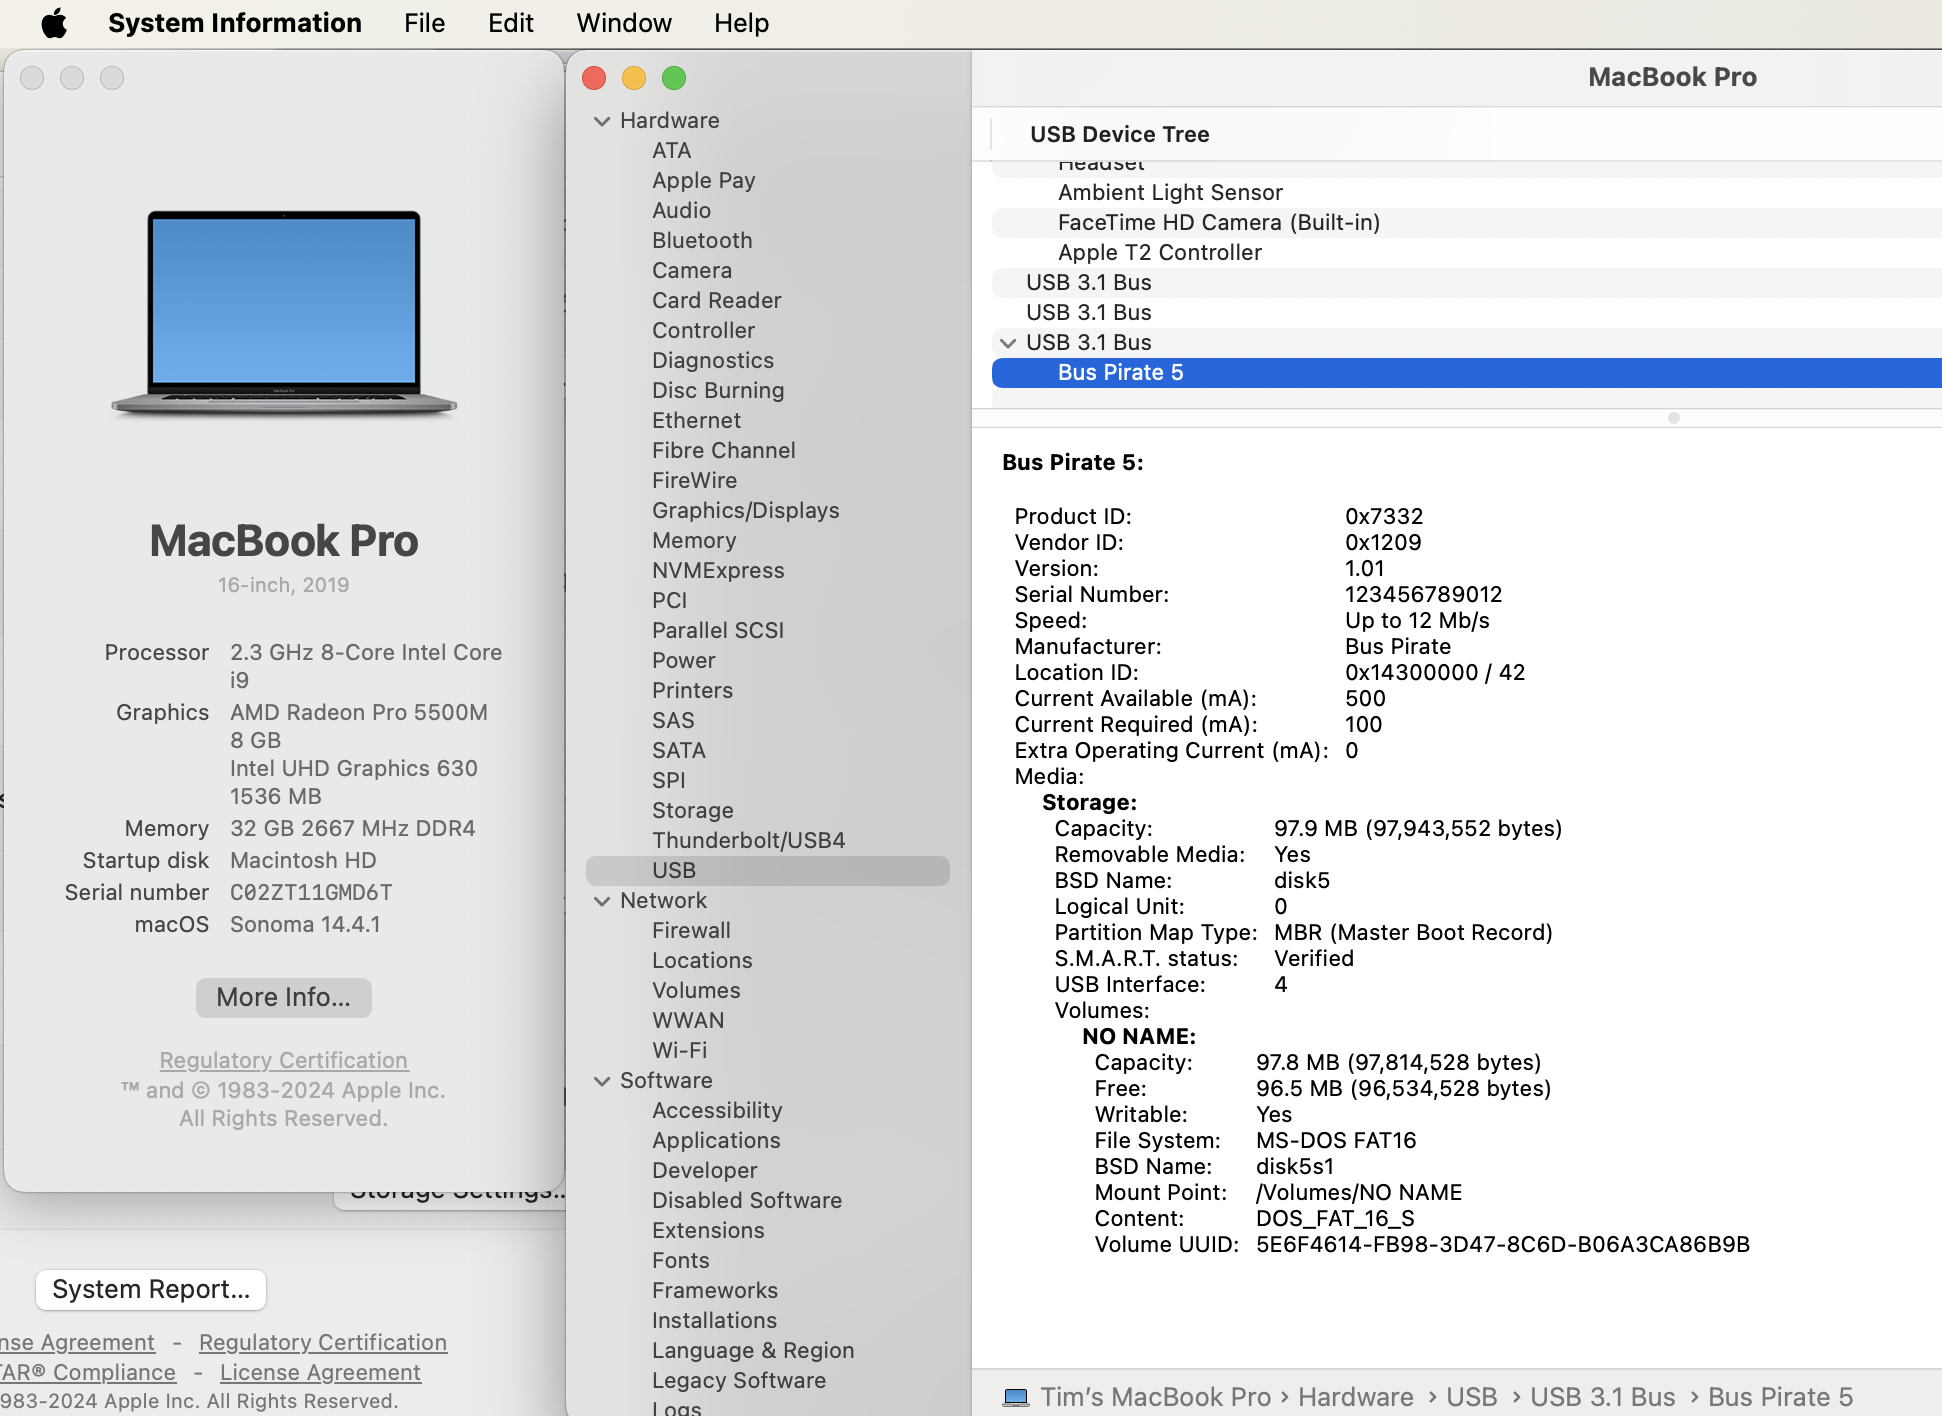
The serial number shown will match the name of the device in /dev/.
Fire up a terminal emulator
Macs come with a terminal emulator called Terminal.
Many Mac users prefer to install iTerm2 and use it instead of Terminal.
Unlike on Windows, a terminal emulator on a Mac doesn’t typically give you an option to connect to a serial port. Instead it gives you a shell, and you can run a command from the shell to connect to the serial port.
The default shell on Macs is zsh. If your prompt ends with a % sign, you’re using zsh. If it ends with a $, you’re likely using bash, which was the default on older Macs.
There are two commands that come preinstalled that you can use to connect to the serial port:
A third popular option is to use Homebrew to install Minicom.
Neither Terminal nor GNU Screen support full color mode, so the text will be gray when you first connect. After connecting, you can
switch BP to ANSI-256 color, which is located under “Configuration options” c, “ANSI color mode” 2. Once you do that,
it will look more like the screenshots in this documentation.
Of the options presented here, only iTerm2 + cu supports full color mode at the moment, although support is being added to Screen.
cu
Cu writes lock files to /var/spool/uucp, so you’ll need to make that directory writable.
% sudo chmod o+w /var/spool/uucpConnect to the serial port:
% cu -l /dev/cu.usbmodem1234567890121cu uses the ~ key as an escape character, such like ssh.
To exit cu, type ~.. The ~ is only recongized at the start of a line, so you’ll likely need to hit Enter first.
GNU Screen
Connect to the serial port like this:
screen /dev/cu.usbmodem1234567890121Screen uses Control-A as its meta key. Use ^a ^\ to exit. ^a ? for help.
Connecting to serial ports isn’t its primary purpose.. Screen is a terminal multiplier. You can “detach” with ^a d, and it keeps running. screen -r reconnects. ^a c opens another terminal inside of screen. There are commands to switch between these “windows”, to split them, even to let multiple users control the same terminal at once.
It has many more features beyond the scope of this documentation.
Minicom
Unlike the others, minicom does not come preintalled. If you have Homebrew installed, you can install it with brew install minicom.
You can connect with minicom with minicom -D /dev/cu.usbmodem1234567890121.
The “meta” key for minicom defaults to Escape. To exit, hold Esc and press q. Esc+z for help.
Help document the Bus Pirate, post your instructions in the forum and we’ll add them to the docs.
Common issues
If you see lots of extra garbage characters in the terminal that is probably the VT100 code that updates the live view statusbar. Verify that your terminal supports VT100 mode and that VT100 mode is enabled.